Tuesday, November 29, 2011

Pannetone

Pannetone, awal kali dapet surcin kali ini bener-bener blank sama nama makanan yang satu ini, yang kemudian diketahui adalah sejenis roti yang biasa dihidangkan pada hari Natal di Italia. Hiks roti, setelah scones kemaren keras-keras ga jelas juntrungannya hehe, sekarang ketemu makanan sejenis lagi. Tapi ngga apa2 tetep semangat mencoba, dan ini dia hasil eksperimen ku hehehe


Panettone (traditional Italian christmas bread)
Source: The Worldwide Gourmet

Ingredients
 - 1 1/2 cakes of fresh baker's yeast - ganti dengan 11 gram instant dry yeast
- 65 ml (1/4 cup) sugar
 - 6 tbsp. warm water
- 6 egg yolks
- Finely grated zest of 1 lemon
- A pinch of salt
 - 500-750 ml (2-3 cups) flour
 - 100 ml (6 tbsp.) diced candied peel
 - 100 g (6 tbsp.) + 2 tbsp.butter
- 4 tbsp. sultanas - ganti dengan kismis biasa
- 4 tbsp. currants - skip
 - 1 tsp. vanilla

Method
Sprinkle 1 tbsp. granulated sugar and the yeast over the warm milk and let sit 3 minutes; mix and let rest in a warm draft-free place (e.g., a warm oven that has been turned off) until the mixture has doubled in volume, approximately 5 minutes;
Pour the mixture into a bowl, add in the egg yolks, vanilla, lemon zest, salt and remaining sugar;
gradually mix in 500 ml (2 c.) of the flour by hand until a smooth consistency is attained - the dough should easily come together into a ball;
Gradually add the butter cut into small dice and beat until the dough becomes smoother and more elastic;
Add 125 to 250 ml (1/2 to 1 c.) more flour until the dough is firm and silky but not sticky;
Place the ball onto a lightly floured surface. Knead the dough for approximately 10 minutes. When the dough is smooth and shiny, place into a buttered bowl; dust lightly with flour, cover with a kitchen towel and place in a warm draft-free place for about 45 minutes until doubled in volume;
Punch down the dough firmly with your fist and flatten it out in the bowl; add the candied lemon peel, raisins and currants and knead until well distributed but without working the dough more than necessary;
Line a large bread pan with brown paper that has been well buttered on both sides; place the dough in the pan and trace a cross on top;
Cover with buttered paper and let rise again in a warm place for 15 minutes;
remove the paper from the top; brush the top with softened butter.

Baking
Preheat the oven to 200°C (400° F);
Place the bread pan on the middle rack of the oven and bake for 10 minutes;
Reduce the oven temperature to 160° C (350° F) and continue baking for another 30 to 40 minutes, brushing again with melted butter; the bread is done when the surface is golden and crispy;
Remove from the oven; remove the paper and let cool for 15 minutes before unmolding.


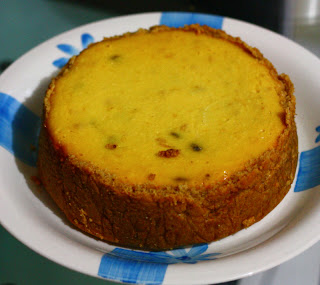
Hasilnya, kulitnya keras dan rotinya kurang manis, walau kalo pas kegigit di kismisnya sih yummy.
Sepertinya my mistakes are waktu menambahkan kismisnya, saking takut merusak struktur rotinya jadi cuma aku tempel-tempel aja si kismis alhasil jadi ngga merata dan entah kenapa tetep stress juga kulitnya hehe, beres dipanggang kulitnya keras walau dalemnya empuk. Sayangnya udah ngga ada waktu untuk nyoba lagi. Mungkin lain kali bisa coba dan aku upload hasilnya nanti disini yaa... 


Wednesday, September 28, 2011

KBB#25:Devonshire "Birthday Party" Tea


Duh, feeling ngga enak nih waktu dapet tantangan ini. Inget aja waktu ngeliat Masterchef Australia dan tim biru gagal bikin scones yang oke (mereka aja gagal apalagi gw... heheh).
Terbukti waktu pertama kali coba, mau bikin white chocolate scones ngambil resep dari Delicious Magazine, eeee gatot segatot2nya. Adonannya cair dan bentuknya jadi kaya dorayaki, and karena ilfeel jd ga sempet kejepret deh hasilnya.

Berhari-hari bete plus ketimbun orderan, last minute deh akhirnya nyobain lagi pake resep yang dilampirkan di SurCin nya tantangan kali ini, ini dia resepnya :


Resep Scones:
Sumber: Edmonds Cookery Book, NZ.
Untuk 12 potong

3 cups tepung terigu
6 sdt baking powder
¼ sdt garam
75g mentega
1 - 11/2 cup susu segar
ekstra susu

Ayak tepung, baking powder, dan garam ke dalam mangkuk. Masukkan mentega dan remas hingga berbulir2 seperti remah roti. Tambahkan susu dan aduk cepat menggunakan pisau sampai adonan lembut. Gilas beberapa kali. Tabur tepung sedikit ke atas baking tray. Letakkan dan tekan-tekan adonan scones di atas baking tray. Iris 12 potongan yg sama. Sisakan jarak 2cm antara satu scones dengan yang lainnya. Olesi susu segar di atas scones. Panggang dengan oven 220C selama 10 menit atau hingga matang kecoklatan.


Bikin cuma setengah resep karena udah ngga pede... ihiks2

Dan beginilah jadinya, entah ini gagal atau ngga hehe... tapi kayanya sih gagal, permukaannya keras walau dalemnya sih ngga. Rasanya enak, tapi ngga nagih... *hehe ya iya lah wong gagal...


Karena deadline sudah di depan mata (salah gw jg manajemen waktunya jelek banget).... nekat setor aja deh... mudah2an suatu saat bisa ngulang lagi biar nambah2 teman minum teh.

Eniwei, walau Scones gw ngga sukses seperti yang diharapkan, I am still Happy for KBB yang sudah mencapai usia 4 tahuuun.... yuhuuuu.... semoga makin jaya, member2nya selalu kompak, dan terima kasih untuk share2 ilmunya. Life will never be the same without KBB... hehehe... 


Saturday, July 30, 2011

KBB 24:Rich Chocolate Tart

Rich chocolate tart adalah tantangan KBB untuk bulan Juli ini. Dari namanya aja, sudah kebayang pasti rasanya nyoklat banget. Coba deh intip resepnya :

Rich Chocolate Tart
Sumber: Best Food: Desserts. The Australian Women Weekly.
Untuk 10 porsi

Pastry

185g tepung terigu
25g coklat bubuk
55g icing sugar mixture
150g mentega dingin, cincang
2 kuning telur
1 sdt air dingin

Cara Membuat

  1. Campur tepung, bubuk coklat, gula dan mentega *potong mentega kotak-kotak* di dalam mangkuk FP, lalu proses hingga tercampur rata. *ga punya FP jadi dicampur manual dengan bantuan garpu
  2. Masukkan kuning telur dan air, proses lagi hingga menggumpal. 
  3. Uleni adonan hingga lembut. *adonanku lembek dan lengket
  4. Tutup menggunakan plastik, dinginkan di kulkas selama 30 menit.
  5. Panaskan oven, suhu sedang (moderate).
  6. Giling adonan pastry hingga cukup lebar untuk memuat loyang tart bongkar pasang ukuran 24cm yang sudah diolesi mentega hingga ke sisi2nya. 
  7. Letakkan pastry ke dalam loyang, tekan-tekan ke sisi-sisinya, lalu ratakan pinggirannya. *susah, karena lembek dan lengket jd robek2
  8. Tutup, dinginkan di kulkas selama 30 menit.
  9. Tutup pastry dengan baking paper, isi dengan kacang2an kering atau beras, letakkan di atas loyang oven. 
  10. Panggang tanpa ditutup selama 15 menit.
  11. Keluarkan kertas dan kacang2an/beras, panggang lagi 10 menit hingga sedang kecoklatan. 
  12. Dinginkan.


Chocolate Filling

4 kuning telur
2 butir telur
55g gula caster
80ml krim kental
300 DCC, lelehkan
1 sdt ekstrak vanilla

Cara Membuat

  1. Buatlah pastry, lalu turunkan panas oven hingga suhu rendah (moderately slow).
  2. Kocok kuning telur, telur dan gula caster di dalam mangkuk kecil dengan mixer hingga kental dan creamy. 
  3. Masukkan krim, coklat dan ekstrak. 
  4. Tuang adonan coklat ke dalam pastry yang sudah dipanggang. 
  5. Panggang selama 30 menit atau hingga filling matang/set. 
  6. Dinginkan selama 10 menit. 
  7. Jika suka taburi dengan ekstra coklat bubuk, hidangkan.

Beginilah penampakan si rich chocolate tart ini setelah keluar dari oven.


Komentarku tentang resep ini, suka dengan rasa dan kerenyahan pastrynya karena agak lunak jadi mudah dipotong. Sayang aku kurang suka dengan fillingnya, karena terlalu manis dan telor banget rasanya hehe, next time mungkin akan coba dengan cokelat ganache saja. Tapi tetap resepnya pantas dicoba kok, lumayan buat teman minum teh sore-sore, slurrrp.... :)

Wednesday, May 18, 2011

KBB#23 Lemon Cheesecake

Puff puff, ngilangin debu bertebaran di blog nih. Uudah sebulan lebih ngga pernah diupdate xixixi. Sejak asyik dengan dunia Blackberry jadi kelupaan mengunjungi blog baking tersayang ini. Eniwei, karena ada tantangan KBB yang ke 23 ini, jadilah aku balik ke blog untuk tulis-tulis hasil coba resep yang dikirim ibu-ibu host yaitu.... "Lemon Cheesecake". Yaay, kebetulan berbarengan sama ultahnya my little K jadi sekalian diniatin untuk dipasangkan lilin buat ditiup si bayi kecil... yang udah umur 4 tahun ini.


Ini dia resepnya :

Lemon Cheesecake
Sumber: Successful Baking


Bahan-bahan :
Untuk 8-10 porsi
¼ cup port ----- (*sejenis wine - aku ganti dengan orange juice)
¼ cup orange juice
75g sultanas (ngubek-ngubek ngga nemu, jadi diganti kismis biasa)
150g mascarpone
400g ricotta
125g gula kastor
2 btr telur, pisahkan kuning dan putihnya
3 buah lemon, parut kulitnya
60g tepung terigu
80g manisan apricot, iris tipis (ga nemu juga *payah* diganti manisan mangga)

Crust:
30g mentega tawar
185g kacang2an, haluskan (aku pake almond bubuk xixixi)
8 sdt gula kastor
4 sdt dark brown sugar (diganti dgn palm sugar sesuai petunjuk HOST)
½ sdt bubuk kayu manis (ngga pake, karena ngga suka)
¼ sdt bubuk mixed spice (pake spekoek yg buat kue lapis itu)

Cara Membuat
Panaskan oven 170C. Siapkan loyang ukuran 23cm, olesi dasar dan sisi2 loyang dengan mentega leleh. Alasi dasar loyang dengan baking paper, lalu olesi mentega leleh.

Panasi orange juice, kismis dan manisan mangga di dalam panci selama 5 menit. Angkat dari api, tutup dan biarkan selama 15 menit.

Crust: panaskan mentega hingga leleh, masukkan kacang2an, semua gula dan rempah-rempah; aduk rata. Letakkan di dasar dan sisi loyang, tekan-tekan supaya padat dan melekat.


Kocok mascarpone dan ricotta hingga lembut, lalu masukkan gula, kuning telur dan parutan kulit jeruk, lalu masukkan tepung, aduk hingga rata dan lembut. Masukkan campuran sultanas-port-orange juice dan apricots.

Kocok putih telur di dalam mangkuk yang bersih dan bebas lemak hingga soft peaks. Masukkan putih telur kocok ke dalam campuran keju. Tuang ke dalam loyang, ratakan permukaannya.

Letakkan loyang ke atas loyang oven/loyang biscuit (oven tray/baking tray), panggang selama 1 jam, atau hingga permukaan cheesecake set tengah2nya dan berwarna emas kecoklatan di sekelilingnya. Matikan oven. Biarkan cheesecake di dalam oven dengan pintu dibuka sedikit selama 50-60 menit.

Keluarkan cheesecake dari oven. Gunakan pisau tumpul secara perlahan ke sekeliling cheesecake, lalu biarkan hingga betul2 dingin. Keluarkan cheesecake dari loyang dan dinginkan dalam kulkas selama 2 jam sebelum disajikan. (lepas dengan mudah walau tanpa pisau tumpul)


Hasilnya, enak banget.... cuma agak kemanisan buat lidahku (next time bisa kurangin gulanya kalo buat lagi). Setelah dingin lalu dihias dengan whipcream dan jeruk mandarin kalengan, ditempelin angka 4 siap menunggu little K yang mau tiup lilin. 


Beberapa potong dikirim ke kerabat, dan alhamdulillah ada yang minta nambah (ampe jilat2 wadahnya... ).

Thanks again KBB for sharing a wonderful recipe. 


Wednesday, March 30, 2011

KBB#22 Made in Indonesia Plus

Yes, I am in my third challenge of Klub Berani Baking. Now we have to make any baked food (cakes or pudding) which recipe made by Indonesian and add some spun sugar decoration on top of it. Exciting, right ?!


So, after receiving the challenge mail, I tried to make the spun sugar first as I have no clue on how to do it. Seems difficult for me, and after few video watching on you tube, I sacrifice my one and only but ugly balloon whisk  and start boiling sugar and water with composition 2:1. 

I put two pipe covered with foil and seal it to two chairs. As you can see on the picture on the right . 


After the caramel formed, put the torned whisk, pull out and simply swing it on top (around 20 cm tall) of those two pipes. Voila,, they will look like this.... and it is not difficult at all... yippiiii 

And then, start from the bottom, with my hand I push them upward and make a "nest like" spun sugar... :)

By the way those are my way, while here is what written in the KBB mail if you need more serious reference :


Sugar Syrup

Medium use 1 ¼ cups sugar to 1 cup water.
Heavy use 1 ¼ cups sugar to ⅞ cup water.

Step :

1. Heat the sugar syrup to 311 F then plunge into a pan of cold water to halt the cooking process.
2. Cover your work surface with parchment paper. Holding a rolling pin in one hand over the paper, dip the whisk into the sugar syrup and flick it back and forth over the rolling pin so that railing threads are formed.
3. Gently gather up the strands and fold them back over the rolling pin. Loosen and lift them or slide them off the pin gently.
4. Break the sugar in half and gently shape each half as desired in your hands. 

To put these spun sugar decoration on, I chose a recipe that I have got from a local Magazine named Sekar. 
I made a Banana Caramel Pudding which is baked. Here is the recipe :

Caramel Pudding
Source : Sekar Magazine 51/11 edition

Ingredients:
A
200 ml of fresh milk
100 grams of banana

B
3 Eggs
1/2 tsp cinnamon powder
200 grams sugar
1 tbs corn starch
1/2 tsp of salt

C
100 gram sugar
50 ml water

Step:
1. Make caramel with C ingredients by heating sugar on low heat, and after the caramel formed pour water and stir it quickly.

2. Pour caramel in to four heat resistance bowl. 

3. Blend ingredients A in a blender to form a smooth mixture. 

4. Mix mixture A with ingredients B using a handheld mixer on low speed only to make a homogen mixture. 

5. Filter the mixture, and pour into the bowl pre-filled with caramel. 
6. Put the bowl inside a leak-free pan, and fill the pan with water.
7. Bake them in the oven for 30 minutes in 160 degree celcius temperature until firm. 

Here is how the pudding like after finished. 

Made in Indonesia


Made in Indonesia Plus

a review about the pudding. the taste is a lot better than I expected. Do not like cinnamon really much, but surprisingly it taste really good when combined with Banana. Don't believe me? Well just try the recipe and tell me what you think !!

Have a banana day.... :)


Sunday, February 13, 2011

Cars and Thomas Engine Cake

Birthday Cake for Sulthan 3rd Birday. Sulthan is K-Chan's school mate who is sitting in small toddler class.

His mom ordered two cakes, one for birthday celebration at School and the other for candle blowing ceremony which was held at their home.


Sunday, January 30, 2011

KBB#21 Creme Brulee

It was like a dream when reading the challenge email sent by KBB#21 host Mira and Molly that chose crème Brulee as the daring task. I was curious about crème Brulee ever since I watch Whitney Miller making this dessert on one episode of Master Chef. I was wondering how's the taste, the textures and even how would those top caramel impress your tongue? Thus, really huge thanks to the host of #21 challenge... again without KBB maybe I would only keep wonder and wonder and wonder... it surely going to be an everlasting wonder... :P

After reading the recipe, I chose to remove Rhubarb and change it with Pineapple. Yep, as I live in tropical country I thought that it might be nice to have a tropical crème brulee, instead I will learn to peel this fruit on my own which I have never done before.

Here is the recipe, with some modification made by me... :) and I was only making half the recipe.


Creme Brulee
Source: Jamie Oliver: The Naked Chef 2

Serves 6

Ingredients
300g fresh rhubarb – substitute with pineapple
3 Tbs caster sugar
2 vanilla pods
300ml double cream – 500 ml of whipcream
200ml full fat milk – no milk added... all cream (imagine the fat!!!!)
8 egg yolks
80g sugar


How to 
Preheat the oven to 140C.
Roughly slice up the pineapple and place it in a pan with the caster sugar and 5 tablespoons of water. Simmer until tender, divide between serving dishes which your brulee will be cooked in, then set aside.

Score the vanilla pods lengthwise and run the knife up the pod to remove the vanilla seeds.


Scrape these into the pan with the pods, cream and milk and slowly bring to the boil. 

Meanwhile beat together the yolks and the sugar in a bowl until light and fluffy.
When the cream and milk are just boiling, remove the vanilla pods and add little by little to the egg mixture, whisking continuously. (I was using a mesh to separate pods from mixture at this stage) 
I like to remove any bubbles or froth from the mixture before dividing it into the serving dishes. (you can remove it with the aid of kitchen blow torch or scoop big bubble with spoon manually)
 
Stand these in an appropriately sized roasting tray filled with water up the containers, and bake in the pre-heated oven for around 25 minutes until the custard mixture has set but is still slightly wobbly in the centre.

Allow to cool to room temperature then place in the fridge until ready to serve. Sprinkle with sugar and caramelize under a very hot grill or using a kitchen blowtorch. 

Done

And how does it taste? Incredibly yummy... tolerably sweet, and make your day feels even better.

How is the texture? Soft, creamy, simply irresistible, even my husband finish one and a half cup and left only a half cup for me... sigh.

How does the top burnt sugar touch your tongue? Amaaazing... I think I blew it perfectly as it still taste sweet with only a little bitterness, and looks beautiful.... what do you think?

The taste is just as good as I imagine when I saw Whitney made this and spell this dessert's name out of her mouth... wait... it's even better than I expected.

I dare you to try... and be generous... send me some... :)


Wednesday, January 19, 2011

Naruto Birthday Cake


Naruto Theme Birthday Cakes for Arvin... 


Four layers chocolate sponge cake, filled and covered with butter cream.  

Tuesday, January 18, 2011

Bajigur or Bandrek....


Those two mentioned in the title are Sundanese traditional hot drinks. I rarely found those two unique drinks, here in Cikarang now. 

During my childhood in Bandung, every afternoon you will get this kind of drink easily in a food stalls, food market or even somewhere close to my house. 

Getting used to "so so taste" of instant Bajigur or Bandrek, making me feel really glad to "finally" taste the real home made Bajigur and Bandrek at Sari Papandayan Restaurant in Garut. 


Though I can't bring you some, as usual, I took some pictures of it... and imagine that I drank this thick Bajigoer while looking at Papandayan Mountain in front of me... Amaaziiing... :)

And if you never taste Bajigur and Bandrek, and care to know... here is the link to find out more Bajigur and Bandrek. (Lazy meee... I know )

Monday, January 10, 2011

RM Jatinunggal - Hidden Treasury Place

Though I was born to be a Javanese, I spent my childhood time in Bandung which is a Sundanese area. That is why, I am more familiar to Sundanese food such as Karedok, Lotek, compare to Javanese food such as Gudeg and ........... (see I can't even mention more). 

Sometimes, after I live in Cikarang. I miss those delicious fresh and spicy Sundanese food, as in here it won't be easily to find a good Sundanese food. Plenty are available because Cikarang is located in Sunda area, however none can compare the taste of Bandung's Sundanese food. Until I find this place, which is located not quite far from my home in Cikarang, about 30 minutes drive. Hidden place, though so many people comes and enjoy the nice and reasonable price Sundanese Food. Here, I will tell you about Jatinunggal Restaurant at Jonggol. 

This place is located next to Jatinunggal Irigation Line at Jonggol. Just pay attention on  a sign over a bridge on Jonggol-Rawey road. I tried to pin it on Google Map, however I am not sure about the coordinate.  You can send me a message when you plan to go there, and I will happily give you a clue. :)

I went there with my family, consists of Mom, Dad, Hubby, K-Chan, Two Brothers, and Sis in Law. We spent around 300.000 rupiah for all, and here are some of what we ate


Hmm Yummy Right ?

The taste is just right, absolutely Sundanese. Fresh Fishes, grilled perfectly, nice sambal, though my juice was a little bit too sweet for me. But all in all, we were all satisfied. And will do a second visit, of course. 

So why don't you give it a try !