Showing posts with label baking. Show all posts

Wednesday, May 30, 2012

KBB #29 : Eccles Cake


Yaaay.... Ketemu lagi dalam tantangan KBB nomor 29. Tantangan kali ini cukup bikin jiper para member KBB, karena buktinya sampe tanggal 24 baru dua orang yang mengumpulkan tugas. Stress deh pasti yang jadi host. Jipernya gara-gara haruuus bikin kulit pastry sendiri. Buat yang tinggal di negara empat musim atau yg iklimnya dingin, mungkin nggak akan terlalu masalah, tapi buat yang tinggal di Indonesia saya mau ngucapin "wilujeng" alias selamat menikmati tantangan ini. *tanduk mode 'on'

Tantangan kali ini kami diminta untuk membuat sejenis pastry yang berasal dari sebuah kota di Inggris. Kue ini pertama kali tahun 1793 dijual oleh toko James Birch, yang terletak di jalan Vicarage di kota Eccles. Kue dengan bentuk bundar pipih, dan berisi kismis ini menjadi kue yang sangat laku di kala itu dan kemudian dikenal dengan nama "Eccles Cake" sesuai dengan nama kota tempatnya berasal. 

Aturan main tantangan ini.... 
1. Pastry nya wajib dibuat sendiri, tidak diperkenankan membeli puff pastry beku siap bakar. *just as I always did.
2. Isian seperti kismis, kacang-kacangan dapat ditambahkan/diganti sesuai selera. *aku pake kombinasi dried fruit dan peanut yang ready to eat
3, Penggunaan alkohol seperti Brandy, dalam resep ini dapat dihilangkan. *aku ganti dengan fresh lemon juice; catatan juga kalau jalan2 ke kota Eccles nggak bakalan bisa cicip yang aslinya karena mungkin saja pake alkohol. 

Ini dia Resepnya :

ECCLES CAKE
untuk 50 buah

Bahan Isian
6 sdm mentega tawar
1 batang kayu manis
1 sdt pala bubuk
1/2 sdt cengkih bubuk
parutan kulit 2 buah jeruk mandarin
parutan kulit 2 buah jeruk lemon
2 cangkir currants
1/2 cangkir sultana
2 sdm brandy 
1/4 cangkir perasan jeruk lemon
1 sdm gula pasir

Bahan Pastry
1 pound mentega tawar / setara 452 gram
4 cangkir tepung serba guna
1 sdt garam
1-1,5 cangkir air es

Cara Membuat
1. ISIAN
- Panaskan mentega di dalam wajan atau panci kecil.
- Masukkan rempah-rempah, biarkan sampai tercium wanginya.
- Masukkan buah kering, kacang dan lemon juice, brandy (bila menggunakan).
- Masak sampai cairan habis.
- Simpan semalam sebelum digunakan. 

2. PASTRY
- Timbang 339 gram mentega, lalu letakkan di antara dua plastik, gilas hingga rata dan membentuk segi empat berukuran sekitar 9x12 inch.
- Potong dadu sisa mentega, masukkan ke dalam food processor bersama tepung dan garam, kemudian nyalakan food processor dan giling sampai adonan berbulir seperti pasir.
- Tuangkan adonan tepung ke dalam mangkok besar, buat lubang di tengah dan tambahkan air es sedikit demi sedikit.
- Uleni adonan dengan ujung jari sampai terbentuk adonan yang homogen. 
- Bungkus adonan dengan plastik, masukkan ke dalam kulkas dan biarkan semalaman. 
- Keluarkan adonan dari kulkas, dan giling sampai setebal 1/4 inchi. 
- Letakkan mentega yang sudah diratakan di atasnya, tutup dengan adonan, jaga jangan sampai ada mentega yang tidak tertutup. Rapatkan lalu gilas dengan rolling pin sampai terbentuk segi empat berukuran 9x12 inch.
- Lipat seperti melipat surat, masukkan adonan ke dalam plastik dan simpan di dalam kulkas selama 30 menit.
- Keluarkan adonan, giling lagi sampai kira-kira berukuran 9x12 inch, kemudian ulang langkah melipat seperti surat dan dinginkan dalam kulkas selama 30 menit.
- Ulangi lagi sampai sekitar dua kali. *step ini tergantung kepada seberapa renyah pastry yang ingin anda hasilkan, jadi makin banyak lipatan makin renyah jadinya. 

Untuk lebih lengkapnya mengenai cara membuat pastry bisa diintip disini http://www.bakeinfo.co.nz/Facts/Pastry/Puff-pastry

3. MEMBUAT ECCLES CAKE
- Kocok kuning telur, siapkan kuas, sisihkan.
- Giling pastry dengan ketebalan 1/4 inchi, potong dengan cookie cutter diameter 5 cm. 
- Isikan isian, kemudian rapatkan ujung-ujung yang berseberangan (seperti membuat siomay).
- Balikkan, kemudian giling dengan rolling pin (atau ditekan dengan tangan lebih mudah ternyata).
- Kerat sebanyak tiga atau empat garis.
- Tata dalam loyang, olesi kuning telur. 
- Panggang dalam oven bersuhu 190 derajat celcius selama 20 menit. 


Hasilnya, kue yang renyah, dan enak dimakan saat waktu minum teh sore bersama lime and ginger infusion. Bikin menyesal kenapa nggak dikerjakan lebih awal, sempat menunda-nunda karena sudah ketakutan dengan pembuatan pastry yang ternyata cukup mudah walau udara disini sudah mulai panas. Yang pasti dengan membuat kulit pastry sendiri, kita bisa tau persis bahan-bahan apa saja yang digunakan, dibandingkan bila kita membeli yang sudah jadi. Walau beli jadi lebih praktis, tapi selalu dong ingin memberi yang terbaik untuk keluarga. So... SIlahkan dicoba ya resepnya, dan jangan lupa undang saya minum teh setelah kuenya selesai. *wink


Monday, March 26, 2012

KBB #28 : Torta Pasqualina


Naah, makin aneh-aneh kan nama makanan yang jadi tantangannya KBB. Begitu dapet surcin dari Mbak Ami, langsung deh ngubek-ngubek youtube. Dapet satu video, dimana yang membuat sejenis pie ini ibu-ibu yang sudah agak berumur. Aku tertarik banget melihat bagaimana dia melambai-lambaikan si kulit pie yang tipis tapi keliatannya elastis banget dan ga robek. Semangat deh buat nyoba. Mumpung disini keju kejuan lebih murah jadi nggak kebanyakan mikir untuk segera buat.

Oh ya, buat yang belum tau apa itu Torta Pasqualina, ini ada penjelasan dari host untuk tantangan KBB #28 ini 
Torta Pasqualina adalah istilah dalam bahasa Italia yang secara harfiah berarti Kue Paskah. Merupakan hidangan khas Paskah dari Piemonte dan Liguria. Adonannya merupakan adonan berlapis, sedikit seperti 'adonan fillo', tapi lebih tebal dan disebut 'pasta matta' (=crazy dough). Kue yang berasal dari Liguria ini mengandung keju lokal "Prescinseua" yang hanya dapat ditemukan di Liguria. Kejunya sangat creamy, lembut dan sedikit asam. Jika tidak memungkinkan menemukan Prescinseau di tempat anda, bisa disubtitusi dengan ricotta yang sangat lembut atau ricotta biasa dengan tambahan sedikit susu.

Mau coba buat, ini dia resepnya :

Torta Pasqualina
Source: Old Time Cooking Recipes


Ingredients:
DOUGH:
600 g (1 lb 5 oz) white flour
6 Tbs olive oil
a pinch of salt

FILLING:
1 kg (2 lb) Swiss chard (silver beet) or spinach
400 g (0.9 lb) cottage cheese/ricotta cheese
100 g (3.5 oz) parmesan
10 eggs
2 teaspoons marjoram, chopped
2 teaspoons parsley, chopped
garlic, minced (optional)
olive oil
salt, pepper


Preparation:
1. DOUGH:
-Combine flour, oil, a pinch of salt and enough cold water to make a medium soft dough.
-Knead well for 10 minutes or until the dough becomes elastic.
-Divide the dough into 14 balls.
-Cover with cloth and let stand for about 1 hour.

2. FILLING:
-Clean, wash and dry the Swiss chard.
-Place in a saucepan with little boiling water and cook at high heat until wilted.
-Cool, then squeeze out excess liquid and chop finely.
-Add 50 g (1.7 oz) parmesan cheese, marjoram, parsley, garlic and 2 eggs. Season with salt and pepper. *modifikasi aku langsung campur sama ricotta cheese -- mengakali picky eaters ;)

3. Oil a round shallow oven dish, 9 inches (22 cm) in diameter.
4. Flatten each piece of dough, one at a time, making each a very thin disk, larger than the baking pan you are going to use.
5. Lay the pastry on the oven dish, allowing it to flow over the edges. Oil it lightly.
6. Place another disk over it and repeat until you have used 7 disks.
7. Spread the Swiss chard stuffing over the dough, and then spread the cottage cheese over the greens level with a knife. *aku jadi cuma ada satu lapis aja karena sudah dicampur bayam dan kejunya
8. Make 8 small cavities. Pour a raw egg into each cavity and sprinkle each with salt, pepper and remaining parmesan cheese.
9. Cover the whole lot with the same number of pastry sheets, each brushed with oil.
10. Pinch the borders and trim the excess dough, prick the top of the pie in a few places and then brush with oil. *kayanya tusuk2nya kurang sadis, jadi tutup pieku ngembaaaang kaya jamur hehehe
11. Bake for 1 hour in 190 C (375 F) oven. Allow to rest before removing from the cake tin


Ini pie udah pasti sehat banget, ada keju, sayuran, telur, lengkap karbohidrat, protein, lemak, kalsium dan serat hehehe. Kalo punya anak fussy eater, bisa dicoba nih resepnya. Dijamin nggak perlu masak dua kali buat anak sama bapaknya, karena dua-duanya juga bisa suka. 

Well, selamat mencoba yaaa....

Wednesday, March 14, 2012

Caribbean Banana Bread

Sekarang ini sudah 3 minggu kami pindah ke Belfast. Ayah sudah mulai dengan aktivitas penelitiannya, dan k-chan juga sudah sekolah. Seperti biasa, Ibu yang nggak bisa diem ini sudah mulai gatel ingin panggang-panggang kue lagi. Dengan agak nekad, walau belum punya mixer maupun timbangan, coba-coba bikin kue ala tante Inggit alias segalanya serba secukupnya (pake feeling aja). So, cari-cari resep kue yang kayanya beresiko rendah dikerjakan tanpa presisi dan akurasi, akhirnya dapet juga di buku hadiah dari uni Alda.

Berikut ini resepnya :

Caribbean Banana Bread
Resep dari Cakes Galore by Valerie Barrett

Bahan
2 pisang, kupas
2 sdm madu
200 gr self raising flour
1/2 sdt baking powder
1 sdt parutan pala
150 gr unsalted butter, suhu ruang
175 gr soft light brown sugar
2 telur, kocok lepas
50 gram pecans, cincang halus


Cara Membuat
1. Panaskan oven dengan suhu 180 derajat celcius. Oles loyang roti *loaf tin dengan mentega dan alasi dengan kertas roti.
2. Haluskan pisang bersama madu. Ayak tepung, baking powder dan bubuk pala.
3. Kocok mentega dan gula sampai pucat dan lembut. Lalu tambahkan telur secara bertahap, aduk rata.
4. Tambahkan pisang halus, tepung dan kacang ke dalam adonan telur. Aduk rata.
5. Tuang adonan ke dalam loyang, ratakan.
6. Panggang dalam oven selama 50-60 menit, atau sampai mengembang dan matang.
5. Dinginkan dalam loyang selama 10 menit, keluarkan dan biarkan dingin, potong-potong.


Kuenya enak, sayangnya karena tidak sabaran, panas-panas kuenya sudah aku keluarkan dan aku potong-potong. Jadi agak kurang rapi kelihatannya. Walaupun begitu, kuenya tetap laris tandas (ayah suka banget ternyata) dan sepertinya akan jadi kue andalan untuk sekedar ngopi-ngopi atau ngemil di sore hari.

Nggak percaya? Silahkan dicoba resepnya :)


Sunday, January 30, 2011

KBB#21 Creme Brulee

It was like a dream when reading the challenge email sent by KBB#21 host Mira and Molly that chose crème Brulee as the daring task. I was curious about crème Brulee ever since I watch Whitney Miller making this dessert on one episode of Master Chef. I was wondering how's the taste, the textures and even how would those top caramel impress your tongue? Thus, really huge thanks to the host of #21 challenge... again without KBB maybe I would only keep wonder and wonder and wonder... it surely going to be an everlasting wonder... :P

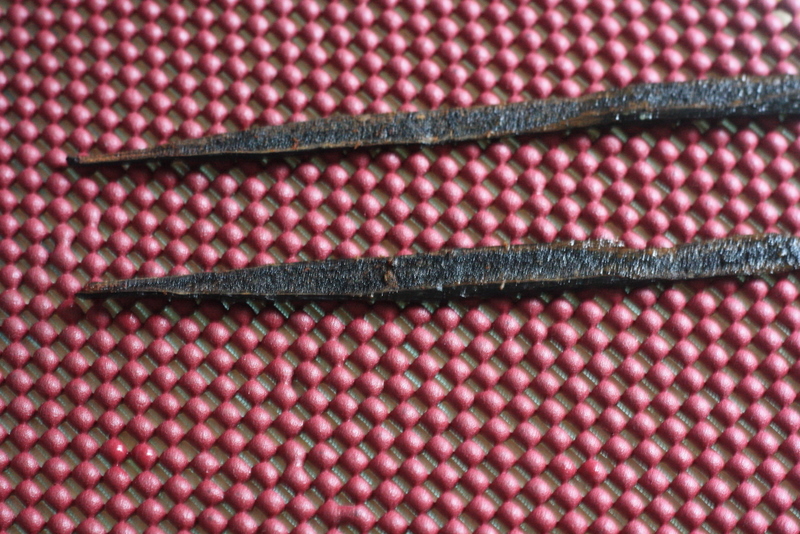
After reading the recipe, I chose to remove Rhubarb and change it with Pineapple. Yep, as I live in tropical country I thought that it might be nice to have a tropical crème brulee, instead I will learn to peel this fruit on my own which I have never done before.

Here is the recipe, with some modification made by me... :) and I was only making half the recipe.


Creme Brulee
Source: Jamie Oliver: The Naked Chef 2

Serves 6

Ingredients
300g fresh rhubarb – substitute with pineapple
3 Tbs caster sugar
2 vanilla pods
300ml double cream – 500 ml of whipcream
200ml full fat milk – no milk added... all cream (imagine the fat!!!!)
8 egg yolks
80g sugar


How to 
Preheat the oven to 140C.
Roughly slice up the pineapple and place it in a pan with the caster sugar and 5 tablespoons of water. Simmer until tender, divide between serving dishes which your brulee will be cooked in, then set aside.

Score the vanilla pods lengthwise and run the knife up the pod to remove the vanilla seeds.


Scrape these into the pan with the pods, cream and milk and slowly bring to the boil. 

Meanwhile beat together the yolks and the sugar in a bowl until light and fluffy.
When the cream and milk are just boiling, remove the vanilla pods and add little by little to the egg mixture, whisking continuously. (I was using a mesh to separate pods from mixture at this stage) 
I like to remove any bubbles or froth from the mixture before dividing it into the serving dishes. (you can remove it with the aid of kitchen blow torch or scoop big bubble with spoon manually)
 
Stand these in an appropriately sized roasting tray filled with water up the containers, and bake in the pre-heated oven for around 25 minutes until the custard mixture has set but is still slightly wobbly in the centre.

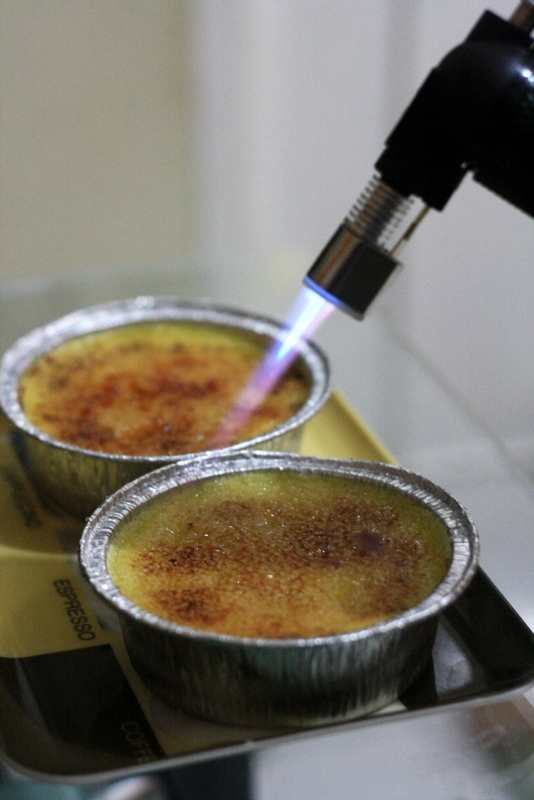
Allow to cool to room temperature then place in the fridge until ready to serve. Sprinkle with sugar and caramelize under a very hot grill or using a kitchen blowtorch. 

Done

And how does it taste? Incredibly yummy... tolerably sweet, and make your day feels even better.

How is the texture? Soft, creamy, simply irresistible, even my husband finish one and a half cup and left only a half cup for me... sigh.

How does the top burnt sugar touch your tongue? Amaaazing... I think I blew it perfectly as it still taste sweet with only a little bitterness, and looks beautiful.... what do you think?

The taste is just as good as I imagine when I saw Whitney made this and spell this dessert's name out of her mouth... wait... it's even better than I expected.

I dare you to try... and be generous... send me some... :)


Wednesday, January 19, 2011

Naruto Birthday Cake


Naruto Theme Birthday Cakes for Arvin... 


Four layers chocolate sponge cake, filled and covered with butter cream.  

Thursday, December 23, 2010

Tira Miss You

Hi, long time no see...
Yep, it's been a while since my last "english post". Someone was complaining about my KBB post which was written in bahasa... yeah it was an important post for me, so that I prefer to write it in bahasa.

Now, I am writing again, yes and it's in english. Wohoo enough for un-important prolog, we'll go to the main topics okay.


So, I will tell you about one easy dessert to make, originated from Italy. People call this tremendously delicious dessert with TIRAMISU... I wrote it Tira miss you as it's been a long time that I didn't write in this blog and it is also been a while since my last Tiramisu making, thus... I miss You

I've got an order, and it became two, from two friends that I met at K-Chan's school. Frankly, they both have  husbands with the same birth date. So both were ordering this Tiramisu for their husband's birthday. Again, I am using NCC recipe, which has passed the most difficult tester which are my campus mates... the yummy mommies. This dessert has become their favourite, and I am so proud as one of them was the first person who introduced Tiramisu to me, and now she is the one who often ask me to make and bring Tiramisu for all of us when we have the chance to meet.

Here is the recipe, it is reaaally easy :

Tiramisu
Recipe : By Fatmah Bahalwan NCC

Ingredients
250 gr of mascarpone cheese
300 ml whipped cream
100 gr powdered sugar
1/2 tsp vanilla essence
4 egg yolks
50 gr castor sugar

Additional Ingredients
2 tbs instant coffee plus 1 tbs of sugar, dilute with 150 ml of warm water
20 pcs lady fingers

Garnish:
Whipped cream and chocolate powder as much as you like

How To
Soften mascarpone cheese using balloon whisk, only to form a soft mixture
Whip cream and powdered sugar to form a thick cream, set aside in the refrigerator
Mix egg yolks, castor sugar and vanilla essence to thick, continue mixing on boiled water to warm the eggs, bring to room temperature while continuing mixing.
Mix whipped cream, mascarpone cheese using balloon whisk, spatula or mixer set on the lowest speed.
Add egg yolks mixtures, mix thoroughly and set aside

Finishing
Dip lady fingers in the coffee and put all over the bottom of a springform pan.
Add mascarpone mixture, flat the surface and put another layer of dipped lady fingers on top of it.
Repeat this step until you get the height of cakes that you want or until all the mixture are finish. :)
Garnish with whipped cream and chocolate powder.
Freeze in refrigerator for 4 hours before served

There you go, you are ready to enjoy the Tiramisu. Trust me you will never find a better Tiramisu than this one. It is still good though it is alcohol free.

Happy Friday

Thursday, November 18, 2010

KBB#20 Biskuit Tradisional : Kue Bangket Susu


Pucuk dicinta ulam tiba, akhirnya... KBB buka lagi pendaftaran untuk anggota baru dan dengan membulatkan tekad... aku mendaftar, hihihi, wish me luck ya, semoga bisa memperkuat komitmen aku dalam dunia perbakingan, amiin... halah serius banget... :)


Daan, akhir oktober, datanglah si surat cinta dari host tantangan KBB#20. Oh iya, statusku sekarang masih calon anggota, untuk diterima sebagai anggota, harus memenuhi dua tantangan dulu. You see bahwa ini bukan klub baking biasa... :)

Owkeh, tantangan bulan ini adalah bikin "Kue Bangket". Tilik punya tilik, sebenernya sejak lebaran udah salin2 resepnya dari blognya mbak riana ambarsari, cuma ngga dikerja-kerjain. Nah ini nih fungsinya ikut KBB jadi tiap dua bulan at least aku harus tetep baking, semangat ga semangat, bete ngga bete, biar tetep konsisten bow.

Dari dua resep yang dikirim, akhirnya aku prefer bangket susu aja. Karena liat komposisi bahannya seems lebih cocok dengan selera lidahku dan lidah little k. Jadi ini dia resepnya :


Bahan:
• 500 gr sagu
• 100 gr margarine
• 150 gr gula halus
• 75 gr susu kental manis


Cara

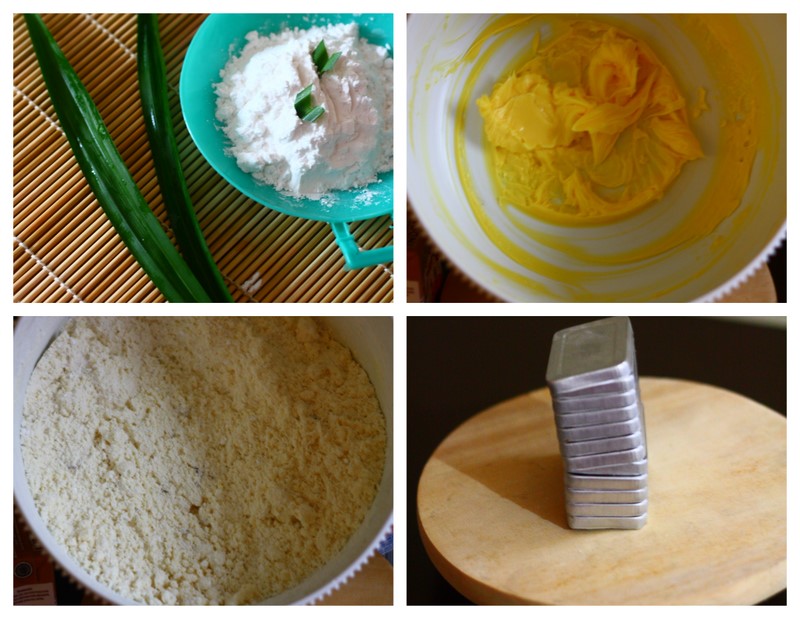
  1. Sangrai tepung sagu dengan daun pandan yang dirobek-robek (api kecil) sampai daun pandan mengering. 
  2. Kocok mentega sampai lembut, kemudian campurkan sisa bahan. 
  3. Cetak dengan cetakan kue satu
  4. Panggang dalam oven bersuhu 140 C selama 10 menit
  5. Pindahkan ke dalam toples setelah kue benar-benar dingin
Searah Jarum Jam : Tepung Sagu dan Pandan, Mentega kocok, Bahan  siap cetak, Cetakan kue satu #1
Oh iya, waktu awal dapet resep ini sempet bingung sama seperti apa bentuk cetakan kue satu. Nyari-nyari di beberapa toko, akhirnya pilihan jatuh sama bentuk cetakan yang gepeng-gepeng seperti gambar di atas, karena biasanya kalo dioleh2in kue satu dari Banyumas bentuknya gepeng2. Ternyata waktu dipake nyetak, karena terlalu tipis, ngga ada kue yang utuh... hiks ancur semua. Untungnya, beli juga cetakan versi lain, yang kaya di bawah ini :


Dan akhirnya bisa dicetak, dipanggang, difoto terus dimakan... dan mmm yummy, just like what I expected. Hampir serupa dengan kue sagu keju my fav cookie (dan bikin kepikiran pingin nambahin keju sekalian di adonannya next time). Rasanya tetep tradisional, tapi ga kalah nagih dengan kue-kue internasional. 


Okay, I'm done with my first bangket cookie... and will wait for the next challenge of KBB. Wish me luck... :)


Wednesday, October 13, 2010

Black Forest for Naomi


Yaay, out of nowhere, three days ago I've got an order for making a birthday cake for Naomi, a 4 years old girl living next door. She will celebrating her birthday in her school this afternoon. Request from the birthday girl, the cake must be a chocolate cake, heart shaped, and topped with looots of chocolate. So, I made a blackforest cake, filled and covered with whip cream and decorated with grated chocolate. Hope she'll like it.

By the way, last night when I was about to decorate the cake, suddenly, the electricity went off. Hiks, I was panic since I covered the cake already with whipcream, and afraid that it will melt and ruin everything. But, with all the optimistic I have in the middle of a dark night, I continue to decorate while wishing the electricity will be recover soon. Decorating cake with only aided by a candle light in the middle of silent night was sooo romantic :P, I put piece by piece of cake while wondering would the birthday girl love the cake, I hope she will, crossing my finger now. Everything were still dark even after I finished decorating. I put the cake back in refrigerator, hoping that the cake will still look as nice as when I finished at the time I wake up the next morning. And, voila, as you see in the picture above it is still looks OK and ready to deliver.

Moral of story, when there is a will there will be a way... never give up no matter what happened. :)

Will deliver the cake to the birthday girl soon... wish me luck!!!

Saturday, October 9, 2010

Cheesy Tuna Pasta

Hi Saturday,
It's weekend already, and I am extremely happy. I was quite sad on few last days, and so happy after had a short chat with my dearest mate Mutiara this morning. Thanks Muti for encouraging me and keeping my feet on the ground.
Ok, enough for the prologue now let's go to the cooking matter. Again, I've got a magazine from Myrna when she came home last week from Australia, and it really makes me happy because beside getting a lot of recipes I can get lots of inspiration by seeing nice unique food photos from it. I browse the magazine fastly and look at this healthy pasta and cheese recipe. I believe that my daughter, K, would love it too. So after the lovely chatting with Mutiara I then prepared this food for breakfast on a rainy happy Saturday. By the way, sorry for the bad picture. Later on I will try to take a better picture if I remake this food (and I know I will).


Cheesy Tuna Pasta Bake
Source : Australian Good Food Magazine with some modification by me

Ingredients
250g macaroni
60g butter
35g plain flour
1 tsp curry powder (I skipped this)
625 ml low fat milk (any kind milk will do)
120g of frozen peas (I used frozen peas, carrot and corn)
90g grated reduced fat-cheddar (I used regular cheddar)
pinch of grated nutmeg
425 g can tuna in water, drained, flaked
2 slices white bread, roughly torn
2 tbsp chopped flat leaf parsley (I skipped this)
200g salad greens, to serve (I skipped this)

How To

  1. Preheat oven to 230C, grease a 6 cup capacity ovenproof dish.
  2. Cook macaroni, according to package directions. Drain.
  3. Meanwhile, melt butter in a pan on meium heat. Add flour, and curry powder if using and cook. Stirring for 1 minute until colour lightens. Gradually stir in milk and cook, stirring for 2-3 minutes until sauce boils and thicken (I turned off the fire, until all portion of milk were added, to reduce heat).
  4. Add frozen vegetables, 1/2 cup of cheddar cheese and nutmeg. Season and stir for 1 minute until cheese melts.
  5. Add macaroni and tuna and stir to combine. Pour into prepared dish. Combine bread pieces, remaining cheddar and parsley and scatter over pasta mixture. Bake for 15 mintues, until golden. Serve with salad. 
This was a "tongue spoiling" breakfast for us. The taste is just right in our mouth.


It is easy to make, only half an hour preparation time and 20 minutes baking time. Will give you sufficient calory to start the day, and yet, really healthy for our lil daughter K and also for you, yes you.... so why don't you try it and have a perfect morning as we had. 
 

Wednesday, September 29, 2010

Cheddar Cheese Cake


I am a slave of cheese. I believe cheese have some magic on the tongue. I was in love with cheese cake for the first time at the time I tried cheese cake from Cizz in Bandung (a city in west java Indonesia). Since I moved to this industrial city, I rarely had the chance to come and visit that cozy store of Cheese Cake which sells lots of variety of cold cheese cakes. Luckily I am in love with baking now, and I started to look for the best cheese cake recipe. I found several recipes, this recipe that I will share to you is one of the recipe I've found. It was, again, submitted by a member of NCC, Mama Aljo. This is an economic version of Japanese Cheese Cake. She used cheddar cheese as substitute of cream cheese and milk as substitute of whipping cream. This type of cheese cake is a au ban marie baked cheese cake. It means that you have to bake it in a waterbath, so that you will have a moist cotton cheese cake that no one could ever resist. 


Here is the recipe :

Cheddar Cheese Cake 
Source : Aljo's Mom of NCC
with some modification by me

A Ingredients
130ml of milk 
40gram of Butter
125gram of grated Cheddar Cheese 

B Ingredients
20gram flour
15gram corn starch
1 tsp of grated lemon 


C Ingredient
3 egg yolks

D Ingredient
3 egg whites
1 tsp of lemon zest
100gram castor sugar

E Ingredient
Appricot jam

How To
  1. Prepare a 18 cm round baking pan, line with baking sheet and grease butter. 
  2. Mix A ingredients in a stainless steel pan, heat over a shimmering water. Heat to blend.
  3. Add shifted B ingredients, mix thoroughly
  4. Add C ingredients one by one, and mix thoroughly 
  5. Mix D ingredients to form a soft peak, add 1/3 part into the mixture mix thoroughly
  6. Transfer the mixture into the rest part of white eggs 
  7. Pour batter into the pan, put the pan over another pan*
  8. Put the pan inside the oven, and add boiled water into the below pan
  9. Close the oven, baked for around 60 minutes with 150 C temperature
  10. Once the top side turned golden yellow, turned the oven off, and cool the cake inside the oven (do not open the oven door until cakes are completely cooled)
  11. Spread appricot jam diluted by hot water over the cakes, and decorate the cake as you wish (I sprayed whipcream over and topped mandarin orange on each cake)

*) Use a pan which height is not more than 1/3 of the main pan. 

I made this cake for Big Bee Club eid meeting last week, and two moms said it tastes good.... happy to hear that (and did not get any feedback from the rest of them). However I personally think this cake is almost as good as the Japanese Cheese Cake though it's using a much cheaper ingredients. 
You really have to try this recipe, and later on please tell me do you like it as much as I do... :)

Thanks for reading and have a good day. 

Wednesday, September 22, 2010

My First Fondant Covered Cake

Hai there... it's a really nice morning. Seems like the sun smiling at me since it doesn't give a too harsh heat as I often had in this industrial city.

Anyway, I would like to share a picture of my birthday cake. I made this Sacher Torte Gateau for my birthday on last august, and covered it with fondant (plastic icing) to make it beautiful. This is my first fondant project and I am happy for it. I am quite satisfied but I don't really like the taste of fondant which is way too sweet for me :P
However, I looove working with fondant and planning a next project, a more chalenging project. I will happily share it to you once I've finished... so wish me luck ok.

Here is my lovely cute birthday cake, hope you like it too as I do

Monday, September 20, 2010

Apple Tart (tarte fine aux pomme)

On May, my dearest mate in Australia sent me a magazine with Curtis Stone in it... yes he is my favourite chef who has really hypnotizing eyes. But then, it was not him that attracted me. I found this recipe of apple tart which looked so nice topped with ice cream, and I can't help my self to try it. It was really easy to make, since I bought a ready made puff pastry for the taart base. I skipped the vanilla bean ice cream, but still it tastes super... :)

Here is the picture


Not bad right?
It becomes our simple, healthy and favourite dessert of all time.
I wrote the recipe for you if you'd like to give a try and pamper your tongue with this wonderful dessert.

Apple Tart
By Guillaume Brahimi
Source : Delicious Magazine, April 2010
Ingredients
4 golden delicious apple
a squeeze of lemon juice (to keep apples from discoloring)
2 sheets frozen puff pastry, thawed
1 egg, beaten
unsalted melted butter, to brush
3 tbs caster sugar

How to
  1. Preheat the oven to 180 degree celcius and line 2 baking trays with baking paper. Peel, core and quarter the apples, then cut into very thin slices (a mandoline is ideal). Toss the slices in a little lemon juice to keep from discolouring.
  2. Using a round 12 cm cutter, cut pastry into 8 rounds and divide between trays, leaving plenty of space between each pastry round. Brush pastry with egg.
  3. Arrange apple slices on pastry in a circle, ensuring the slices overlap slightly.
  4. Brush apples with melted butter and sprinkle each with 1 tsp sugar. Bake for 25-30 minutes, sprinklling with remaining sugar for the final 5 minutes of cooking time, until pastry is crisp and apples are golden and crisped at the edges. Serve warm, topped with a scoop of vanilla bean ice cream (I skipped this)
There you go, enjoy the picture and hope you like it.